What screams Americana more than Apple Pie! For years there wasn’t a gluten free flour fine enough to make a perfectly flaky pie crust, so we would opt out of pie making and bake our tasty seasonal fruit crisp instead. Not any more! Using our simple pie crust recipe, gluten free or not, everyone will be asking for more apple pie please!
Apple pie is a classic dessert that’s loved by many, but what if you’re on a gluten-free diet? The good news is that you can still enjoy this delicious treat, thanks to some thoughtful recipe adaptations both with gluten free and dairy free options. This blog post will help guide you through making a gluten-free apple pie that’s just as delightful as the traditional version. Plus, we’ll share some helpful tips, answer frequently asked questions, and even explore different variations.
Apples are well known for their benefits! Combine fruits, add berries and you will have a feel good delicious dessert you can serve with confidence to your family and friends! We recommend using organic apples as they are on EWG’s Dirty Dozen list from Environmental Working Group… Keeping pesticides and other chemicals out of our food. Good to Know…
Gluten-Free Apple Pie FAQ
- Can I use pre-made gluten-free pie crust? Absolutely! Many grocery stores carry gluten-free pie crusts, perfect for those short on time.
- What types of apples are best? Granny Smith, pink lady or Honey-crisp apples are sweet and tart, or a mix of varieties can be used.
- Can I make the pie dairy-free? Substitute butter with a dairy-free alternative, such as coconut oil or Miyokos nut butter.
- How do I store the pie? Keep it covered at room temperature for up to 2 days, or refrigerate for longer storage.
Variations and Serving Ideas
- Top with Ice Cream: Serve your apple pie with a scoop of vanilla ice cream or an alternative ice cream for an indulgent treat.
- Add Other Fruits: Mix in berries or pears for added flavor and texture.
- Make Mini Pies: Use a muffin tin to create individual servings, perfect for gatherings.
Bake an Apple Pie and bring warmth and comfort to the party.
Gluten free apple pie brings the warmth and comfort of a traditional apple pie to those following a gluten-free diet. With the right ingredients and some love and care, you can create a pie that’s both delicious and gluten-free.
This classic dessert’s gluten-free version proves that dietary restrictions don’t mean missing out on favorite treats. So grab your apron, head to the kitchen, and treat yourself and your loved ones to this yummy Apple Pie! We promise it won’t disappoint!
Watch how we make it!
Note: Always ensure that your ingredients are certified gluten-free if you’re cooking for someone with a gluten intolerance or celiac disease.
If you’re interested in more gluten-free recipes, check out our Gluten-Free Baking Guide or explore other delicious gluten free desserts. Grain Free Blueberry Pie or fresh glazed Strawberry Pie are two other winning gluten free pie desserts!
Happy baking!
Print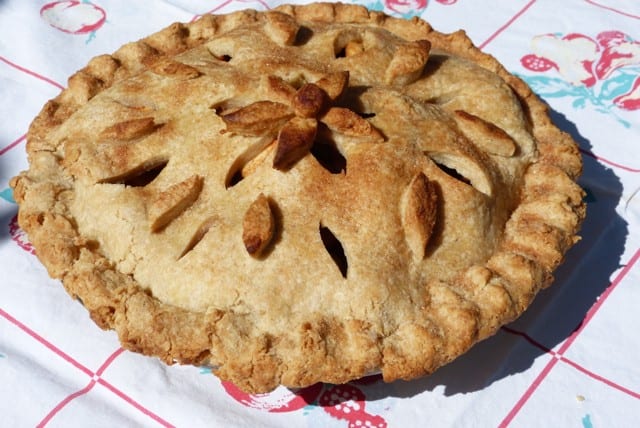
Gluten Free Apple Pie
What screams Americana more than Apple Pie!
- Total Time: 0 hours
Ingredients
8 large apples cored, peeled, and thinly sliced ( you can also use any seasonal fruit: peaches nectarines, plums, or berries)
1⁄2 C organic cane sugar, coconut sugar or Monk fruit
2 Tbsp. flour (Pamela’s gluten free Baking flour blend, King Arthur gluten free baking flour)
1 tsp. cinnamon
1 Tbsp. Butter cut up into small pieces to top fruit (set aside) (an alternative butter such as Miyokos works well)
Cinnamon sugar blend
1 Gluten free pie crust (recipe follows)
Optional: A dash of fresh lemon juice
Pie Crust Ingredients: (Makes both top and bottom)
2 1⁄2 Cups gluten free flour ( Pamela’s Baking flour, King Arthur’s gluten free or Cup for Cup)
1 C unsalted butter, MUST BE chilled cut into small pieces
1⁄4 C of ice water or iced orange juice
2 tsp. organic sugar
1⁄2 tsp. salt
1 9″ pie plate
Rolling pin
Pie cloth or flour sack towel for rolling out pie crust
Extra flour in a cup for rolling out your pie crusts
Instructions
- Preheat oven to 350-degrees.
- In a large bowl, or food processor ( we love using the food processor), pulse or whisk all ingredients together. In the food processor, the dough ball will quickly form, do not over mix. the minute it turns into a ball, remove.
- Chill the dough. Wrap dough in parchment paper, and then put it into a zip lock baggie in refrigerator for at least 30 minutes.
- Flour a “flour sack cloth” and your rolling pin.
- Press the chilled dough flat. cut in half. Reserve the second half of dough for the top of pie.
- Roll out the dough to fit into a 9″ pie plate. Try to make the crust about 1/4″.
- Carefully slide your hand under the cloth centering it under the crust. Using the cloth will help you place the crust with ease into pie plate. Flip the crust gently into the pie plate.
- If crust cracks not to worry, simply push the dough back in place with your fingers.
- Place sliced fruit into bottom pie crust.
- Top fruit with small pieces of diced butter.
- Cover fruit and butter with second crust. Polk holes in top using a fork or make a design. Crimp edges using your fingers or use fork and press crusts together.
- Other fruit options and combinations: apple/pear, apple/berry, apple rhubarb, apple/peach
Pie Crust
- With food processor, combine flour, salt and sugar.
- Add 1 Cup cold butter pieces and pulse the machine until mixture resembles coarse meal.
- Gradually add 1⁄4 Cup, or less, iced water or iced orange juice and process just until dough begins to form into a ball and holds together.
- Divide dough in half. Wrap and chill in the refrigerator for at least 30 minutes. This crust can be made the day before.
- Once you take it out from the refrigerator, give it 10 minutes to soften.
- Roll dough out on a well floured “Silpat” or plastic wrap as shown in our CGK video.
- Make sure your rolling pin is also well floured.
- Take one half of the dough and roll it out. Place the crust on the bottom of your pie plate.
- Fill the pie crust with your fruit.
- Roll out second pie crust for the top of your pie. Cut out a few shapes or use the tip of a fork to add air holes for your pie to breathe while cooking.
- Top pie with second crust, crimp or use a fork to seal the edges of your pie.
- Sprinkle top with a little cinnamon and sugar.
- Place pie in a preheated 400- degree oven for 15 minutes.
- Lower heat and continue baking at 350-degrees for approx. 45 minutes to 1 hour longer, or until hot and bubbly and crust is nice and browned.
- If the crust looks like its browning too fast, take a pie crust cover and gently lay it over the top of the pie.
- Once done, allow the pie to cool a little before serving.
Notes
Serve with vanilla ice cream. Totally YUM!!!
- Prep Time: 50 min
- Cook Time: 45-60 min
[…] comfortable making pie crust try our Strawberry or Apple Pie recipes. And if you are Paleo, we have a Grain-Free Blueberry Pie waiting just for […]